For this activity we made necklaces with fabric and wooden bead balls. Our plan was for each of the girls to make 2 and be able to have a second one to give away as a gift... turned out only having time to make one, but I think the girls were very happy with thier one :).
What you will need:
- Pieces of fabric that are about 3 inches wide and 40 inches long (or how long the fabric comes). Bascially very long and skinny pieces. A tip: the smaller the print, the cuter the necklace. Where the piece is only 3 inches wide, you only get to really see the fabric if the print is smaller. Small polka-dot and stripes seem to be really cute.
- Beads that are about 20 mm. This is the best deal I could find for them online: http://compare.ebay.com/like/110832991940?var=lv<yp=AllFixedPriceItemTypes&var=sbar&_lwgsi=y&cbt=y
- Sewing machine and thread
- And if you're really good... an iron (we skipped ironing)
What you do:
- Fold the piece of fabric in half the long way and sew it together with the wrong side out
- Using a safety pin to help feed through, put the fabric right side out
- Now that you have a tube, put some beads in the tube and tie knots between them
- After you have your beads where you want, sew the two ends together... and Voila!
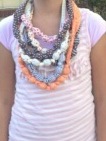 |
| One of the girls sporting a few of the necklaces. Sorry it's blurry! |
 |
| Sewing the fabric together. It was important to me that each girl did the sewing themselves. Some of the girls were nervous while others were experienced sewers. I think it was really good for the girls who have never used one before... some of them were at least able to learn that there is a peddle that drives the machine. |
 |
| The smaller the print on the fabric, the better you will be able to see it once it's a necklace |
 |
| A very pregnant me helping one of the girls turn her fabric right side out. |